- author
-
Peter Lane
- date
-
December 2016
1. Introduction
This document is a guide to writing GEM applications in C using AHCC. I will walk through the implementation of a sample GEM application, in full detail. The program initially displays a single window containing some text. We build the program through various versions to create a multi-window system using sliders and other window widgets. The program is developed further to use menus, file dialogs and other features of AES.
Why AHCC? Although there are many options for C programming on the Atari platform, AHCC is kept up to date and runs natively on (all?) Atari computers and clones. It is a complete IDE, including an editor as well as compiler and linker: I use this program extensively on my Firebee, and also on my Atari STE. AHCC is available from: http://members.chello.nl/h.robbers/ Although written for AHCC, most of what follows will apply to other C compilers for the Atari, but the examples may need some changes in their header files and project/make files.
There are other guides out there. I learnt much of the following using CManShip, written by Clayton Walnum, and available from AtariForge:
-
CManShip HYP http://dev-docs.atariforge.org/files/cmanship.hyp
-
CManShip disk http://dev-docs.atariforge.org/files/cmanship.zip
However, the examples in CManShip require several changes to compile with AHCC (my updated files for AHCC are at https://peterlane.codeberg.page/firebee/). In particular:
-
C89 syntax (especially function signatures)
-
changes to headers and library calls for compatibility
AES has also changed in some respects, particularly if you are running MINT with XaAES or MyAES, with new messages and possibilities not available on the Atari ST. For example, it is possible to use menus internal to a window with XaAES, and also create toolbars at the top of windows.
After working through CManShip, I tried writing a few different programs, and, partly through trial and error, and partly with the help of contributors at http://atari-forum.com, I now feel able to put together some simple GEM programs. This document is, in part, my attempt to record what I have learnt from this process. Also, it is an attempt to simplify and unify the techniques I am using. However, this document is, in many ways, a statement of the limits of my own knowledge, so take anything I write with a healthy degree of skepticism, and let me know of any errors and improvements.
I will assume you already know the C programming language (in particular, C89), and also that you know what a GEM program is. However, I shall try to cover what you need to write in C to get a GEM program working and interacting with the operating system. I will not say much about creating an RSC file - refer to your own program’s documentation. (I use ResourceMaster 3.65.)
This guide is not a complete reference to GEM programming through AES / VDI. Apart from CManShip, I use the following references for lists of constants and function definitions:
-
Katherine Peel’s "The Concise ATARI ST 68000 Programmer’s Reference Guide"
-
http://toshyp.atari.org (also available as a hyp file, to download).
Alternative resources include:
-
Tim Oren’s "Professional GEM" http://www.atari-wiki.com/index.php/Professional_GEM
-
The Atari Compendium http://dev-docs.atariforge.org/files/The_Atari_Compendium.pdf
This guide has been typed on a Firebee using QED. The examples were tested using version 5.3 of the AHCC C compiler on a Firebee and, where appropriate, an Hatari-emulated Atari ST.
This guide, in html and pdf versions, and accompanying source code are available from https://peterlane.codeberg.page/firebee
2. AHCC Setup and Project Files
AHCC can be downloaded from http://members.chello.nl/h.robbers/
There is no installation step: simply unzip and copy to a convenient location on your hard disk. I have a desktop shortcut to the AHCC program, so it is always accessible.
2.1. Version 5.3 Issues
We will be using the include libraries for AHCC (not the short int versions, in sinclude). Unfortunately, as at version 5.3, some of the constants we require are not in "include/aes.h". You need to copy the values from "sinclude/aes.h". These missing constants include:
#define WM_SHADED 22360#define WM_UNSHADED 22361 #define FL3DNONE 0x000
#define FL3DIND 0x0200 #define FL3DBAK 0x0400 #define FL3DACT 0x0600 #define FL3DMASK 0x0600 #define SUBMENU 0x0800
| These two events are used in TOS 4.0 programs. | |
| These flags are needed if you create any dialogs in a resource file. |
If you get "missing constant" messages from AHCC, first see if they are missing from "include/aes.h".
2.2. Project Files
Structure of a project file:
; some comment PROGRAM.PRG ;ahcstart.o ;
program.c ;
ahccstdi.lib ;
ahccgem.lib gemf.lib
| Name of output program to compile. | |
| Optional set of parameters for the compilation. | |
| Separator between output definition and input files. | |
| The standard startup code, for the linker. | |
| Your program’s .c files are listed. | |
| Usually three libraries: these vary depending on the platform you target. |
The usual things to change in the above project are:
-
line (1) gives the name of your program.
-
line (2), the target platform. -7 means the Firebee / Coldfire, -2 for 68020, and nothing for the Atari ST / 68000.
-
line (5), expand this with all the .c files in your project.
-
line (6), change this and the subsequent lines for different Atari targets. e.g. for the Firebee with floating point, use ahccstdf.lib and ahccgemf.lib The libs shown are suitable for targeting the Atari ST / 68000.
The standard library comes in four versions (thanks to Eero Tamminen for explaining this):
-
ahccstdf.lib (Firebee / Coldfire)
-
ahccstd.lib (680x0 + FPU)
-
ahccstdi.lib (68000 with floating point support missing from printf/scanf)
-
ahccstfi.lib (Firebee / Coldfire without FPU, may be compatible with Falcon)
2.3. Settings
When AHCC starts, it is initially set to use the libraries in "sinclude". These use a 'short int' data type.
Before trying the programs here, set AHCC to use the libraries in "include". Do this by opening the Config dialog (Alt-O), finding the "Options for the compiler", and checking the line for "-i include".
3. Overview of a GEM Program
If you are familiar with GUI programming on a more modern computer, kindly forget everything you know. Programming in GEM is primitive. With a modern toolkit, you have many kinds of widgets, from buttons and spinboxes, to complete text editors supporting copy and paste and scrollable display areas. Widgets can be combined with layout managers into complex arrangements. Multi-threading can be used to keep the display refreshed while your program is busy computing some results.
None of this is available in GEM.
In GEM there are, essentially, three elements: menus, dialog boxes (which can contain several "widgets", such as buttons or text fields) and windows. The part that will take most of our time is learning to handle the window: a window is the part of the screen in which your application has free reign. You have complete control over the contents of the window. You decide what gets drawn there, how what you draw there responds to the user moving the sliders around, and you must also ensure what you draw in the window remains there (and only there) as your window interacts with the windows of other applications (in MINT) or desk accessories.
3.1. Outline of Material
The following sections progressively build up a GEM program to illustrate window handling, resulting in a program that responds to all the expected window events, has sliders, and co-exists happily with other windows, preserving its own contents, and not disturbing the neighbours. Each successive version is provided complete in the source code for this guide, and can be compiled using AHCC.
After getting to grips with windows, we move onto an easier aspect of GEM programming: menus. Menus are defined in the program’s RSC file, and all we need to do is respond to a message indicating they have been selected. We will also look at how to respond to keyboard commands, so we can use keyboard shortcuts to menu items.
We then move on to dialog boxes. The main issue with dialog boxes is displaying them, and then retrieving any data the user has input. Dialog boxes are the only place you find widgets such as buttons, text fields and labels (unless you are using an advanced AES permitting toolbars). Again, dialog boxes are defined in the program’s RSC file.
|
|
Although there is a lot of code required for managing GEM, with a little discipline it is possible to preserve most of this code between projects. The examples here follow my own practice in managing this. I shall try to make clear which parts of the examples are GEM requirements, and which are my own suggestions. |
The different components of a GEM window:
A GEM program typically does the following:
-
initialise the application
-
open a VDI screen, and obtain a handle to access it
-
optionally open an RSC file and set up the menu
-
open an initial window or windows
-
enter the event loop, responding to all window / other events until the application is quit
-
free any resources
-
free the VDI screen
-
exit the application
3.2. Some GEM Terms
GEM comes with some terminology of its own, which may not be familiar to the novice GEM programmer.
- AES
-
the part of the operating system which handles the windows, dialogs, menus, mouse etc.
- event
-
is how GEM informs our program that the user has clicked or dragged on a window widget or menu item, or that we must redraw the display in a window.
- handle
-
is a number assigned to identify a window or application. Your application may have several windows open, and will need to identify which window the user is attempting to interact with. The window handle is used as a unique reference for each window in your application. Similarly, there may be several applications running at once, and each application is given a unique application handle to identify it.
- message
-
the information sent to our application about an event. For example, a redraw event would have information about the new window dimensions.
- RSC file
-
is a file which accompanies our GEM program, and contains definitions of the menus and any user-defined dialogs which our program requires. The RSC file is created in an external program, such as ResourceMaster. The advantage of using RSC files is that it is easy to distribute versions of the RSC for different languages, making our GEM programs international.
- VDI
-
the part of the operating system responsible for drawing graphics and text on the screen.
- virtual workstation
-
is the name given to the screen display. When a GEM program starts, it is assigned a handle to access the screen, which we call the
app_handle. In theory, workstations may be created on other screens and/or devices, but in practice this will always be the screen. - widgets
-
are the components of a GEM window or dialog which we can click or interact with, usually by clicking or dragging with the mouse. For example, the close button and sliders on a window are widgets, as is a button in a dialog.
4. Getting Started: Opening a Window
In this first section, we see how to start up a GEM program, and display the most simple of windows. This is the "hello world" of GEM programming.
I find it convenient to separate the code into three sets of source code:
-
main.c contains the
mainfunction, and handles all the setup code before calling your program. -
windows.c contains all the standard GEM stuff, and functions to respond to GEM events.
-
eg_draw.c contains the specific drawing code for this application.
The header file "windows.h" is also important. Here we define some variables which AES requires, and also our own window data structure (see below).
4.1. Starting a GEM Application
We must begin and end our GEM application with some startup and teardown code. These register our application with the operating system, and provide a unique reference to identify our application.
I place this code in main, with a call out to a function to run our own
application (for a complete listing, including header files and variable definitions,
see the source code which accompanies this guide):
void main (int argc, char ** argv) {
	appl_init ();
	open_vwork ();
	start_program ();
	rsrc_free ();
	v_clsvwk (app_handle);
	appl_exit ();
}| This is a built-in AES function, and initialises our application. It returns a unique reference for our application, but we won’t need it just yet. | |
| This function we must provide, and is used to create and open a virtual work station for our program, and store the application handle. | |
| This function we provide, and is where our program runs. | |
| After our program has finished, resources are freed. | |
| Using the application handle from (2), the work station is closed. | |
| And finally our application exits. |
Functions (2) and (3) must be provided by ourselves. (2) is a standard process
to open a virtual workstation (to obtain access to the screen), as shown below.
An important part of this is to create a reference to the screen, through the
call to graf_handle; this reference is stored in the variable app_handle.
void open_vwork (void) {
	int i;
	int dum;

	app_handle = graf_handle (&dum, &dum, &dum, &dum);
	work_in[0] = 2 + Getrez ();
	for (i = 1; i < 10; work_in[i++] = 1);
	work_in[10] = 2;
	v_opnvwk (work_in, &app_handle, work_out);
}| Set up the screen output, and save the reference. We don’t need the values of the other parameters (which relate to the size of text in the screen). | |
| Set up the values for declaring a virtual workstation. | |
| Finally create the virtual workstation, for our application. |
4.2. Opening a window
Each window in our application will display some information to the user. A
window may respond to many events: it can be moved around the screen, be made
smaller or larger, have its sliders moved, and must always keep its contents up
to date. There are, therefore, many pieces of information which a window must
be aware of. For this reason, I use a struct to store all data relevant to
a single window. My basic win_data is as follows:
struct win_data {
  int handle;  /* identifying handle of the window */
  char * text; /* text to display in window        */
};
Every window has a unique handle to identify it. |
|
| Application-specific data, used to control what is shown in window. |
As we proceed through this guide, the contents of win_data will expand. In
addition, your application will have various data that are relevant to the
window. This should also be stored or referred to in win_data: for now, we
use text as our example application’s specific data.
Creating a window requires setting up an instance of win_data with the
relevant data, creating a window, and then showing it. The following code
appears in "windows.c", in the start_program function.
struct win_data wd;
int fullx, fully, fullw, fullh;

/* 1. set up and open our window */
wind_get (0, WF_WORKXYWH, &fullx, &fully, &fullw, &fullh);
wd.handle = wind_create (NAME|CLOSER, fullx, fully, fullw, fullh);
wind_set (wd.handle, WF_NAME, "Example: Version 1", 0, 0);
wind_open (wd.handle, fullx, fully, 300, 200);
wd.text = "Hello";
This line finds the current size of the desktop. The first parameter, 0,
refers to the desktop. The next, WF_WORKXYWH, tells the function which
data to get, and the remaining addresses are locations to store the result. |
|
This line creates the window. The first parameter defines which parts of
the window to include. Notice we save the handle in our wd variable.
Also, we give the maximum dimensions for the window - in this case, the
size of the desktop. |
|
Sets the value of WF_NAME in our window: this is the title of the window.
The title text must be stored in your program somewhere, as the AES does
not make a copy. |
|
| Finally, open the window on the screen. The last four parameters define the x, y position and w, h size of the window. These do not have to be the same as the maximum size of the window. | |
| Set up some application-specific data for our window: in this case, the text to display in the window. |
|
|
On, for example, an Atari ST, it is possible for GEM to run out of windows.
If this happens, the handle retrieved from wind_create will be negative.
You should, between (2) and (3), check if wd.handle is negative, and warn
the user if so. We won’t worry about this in our example programs.
|
The functions wind_set and wind_get will be met frequently as you work
with windows. They both take a window handle as their first parameter, and
then an identifier for some component/information of that window. Handle 0
is used to refer to the desktop.
The identifier refers to different parts of the window. Some of the values we will use include:
-
WF_NAME : the text in the title of the window
-
WF_INFO : the text in the information line of the window
-
WF_WORKXYWH : the current working area of the window, on which you can draw
-
WF_CURRXYWH : the current size of the window, including its widgets
-
WF_PREVXYWH : the previous size of the window, including its widgets
-
WF_FULLXYWH : the maximum size of the window, including its widgets
-
WF_HSLIDE : the position of the horizontal slider
-
WF_VSLIDE : the position of the vertical slider
-
WF_HSLSIZE : the size of the horizontal slider
-
WF_VSLSIZE : the size of the vertical slider
Notice in wind_create we include the flags NAME|CLOSER. These tell our window
to include space for a title, and for a close box. We set the title through
WF_NAME, as above. The close box is used to exit the program, and we discuss
how this works when we cover the event loop, below. Windows can contain many
parts, and to use them we include them in the list of flags. Some common flags are:
-
NAME : for the title of a window
-
CLOSER : adds a close box
-
FULLER : adds option to make window its maximum size, and restore
-
MOVER : allows window to be moved
-
INFO : an internal information line, for the window
-
SIZER : allows window to be resized
-
UPARROW : shows the up arrow on the vertical slider
-
DNARROW : shows the down arrow on the vertical slider
-
VSLIDE : includes a vertical slider
-
LFARROW : shows the left arrow on the horizontal slider
-
RTARROW : shows the right arrow on the horizontal slider
-
HSLIDE : includes a horizontal slider
The function start_program continues as follows:
draw_example (app_handle, &wd);

/* 2. process events for our window */
event_loop (&wd);

/* 3. close and remove our window */
wind_close (wd.handle);
wind_delete (wd.handle); | Draws the content of our window. (This is only here for version 1.) | |
| Waits for the user to interact with our program. Returns when the user closes the window. | |
| To tidy up, we first close our window, to remove it from the screen. | |
| Finally, we delete the window, releasing its handle to be used again. |
4.3. Displaying some content
A function draw_example is used to draw the window contents on the screen.
Our example simply displays the given text in the window.
void draw_example (int app_handle, struct win_data * wd) {

	v_gtext (app_handle, 10, 60, wd->text);

}
Displays text at the given coordinates on the screen. Note we use
app_handle, referring to the screen, in calling the VDI functions. |
4.4. Event Loop
All GEM programs work in an "event driven" manner. This means that the program waits for the user or operating system to send it an event: something to do. The program then does what it wants in response to that event, before returning to the loop. For example, clicking on the close icon at the top-left of a window will send a message to our program. Our program must then do the appropriate thing, in this case, we must close the window and end the program.
For the example we will use the function evnt_mesag to obtain events for our
program. In any real GEM program, you will use its big brother evnt_multi
(or AHCC’s EvntMulti), which lets you spot events from the mouse, keyboard
or other sources as well as those relating to your window; we discuss
other events in a later section. For now, to keep things simple, we will
only need to respond to window events, so we use this call.
void event_loop (struct win_data * wd) {
	int msg_buf[8];

	do {
		evnt_mesag (msg_buf);

	} while (msg_buf[0] != WM_CLOSED);
}| Set up some storage for the event message. | |
| Retrieve the next event. | |
Loop until we receive a WM_CLOSED message, indicating that the
user clicked on close. |
In later sections, we will respond to more kinds of events within the loop.
We will then discuss the other values that can be used in msg_buf.
4.5. Sample Program: Version 1
At this point, we have a window which displays some text inside it. However, if you drag a window over the top of it, the contents will disappear. Also, none of the widgets (except for close) do anything: we cannot move the window, bring it to the top when we click on another window, etc. Also, the background shows through in our window, particularly a problem if you are running a multi-tasking OS, such as MINT.
5. Updating a Window: Redraw Events
We would like to have a decent display in our window. Firstly, it should not show the background, but a nice clean surface. Secondly, it should keep showing the contents we want, even when we drag another window over it and away.
Although there are several steps involved in the following, the code is completely reusable in all your GEM programs. Once you have a working template, you can simply copy it and everything should work.
5.1. Drawing within an Area
Look again at our function draw_example: the call to v_gtext does not
refer to our window, only the screen. Our drawing code could, in theory,
write anywhere on the screen we want. However, this would break the illusion
of our program providing a window onto some information. A better solution
is to set up a clip area: this is a rectangle we define, so that if our
VDI calls go outside that area, they will be clipped to only appear
within the given rectangle.
We thus wrap our call to draw_example in a function draw_interior, which
sets up a clip area and also clears the display of our window for us. The
following draw_interior function does a lot of useful work for us. First,
it hides the mouse, so we don’t draw over it. Second, it sets a clip area
(set_clip is defined in "windows.c"), so that all VDI calls will only show
within the given rectangle. We then get the dimensions of the working area of
our window. This is the same wind_get call we made before, except now we
ask for the working area of our window, instead of the desktop. The working
area will exclude the window boundaries, any sliders, etc.
A call to clear the window and we can then call out to our application’s
drawing code. Finally the clipping is turned off, and the mouse reshown.
/* Draw interior of window, within given clipping rectangle */
void draw_interior (struct win_data * wd, GRECT clip) {
	int pxy[4];
	int wrkx, wrky, wrkw, wrkh; /* some variables describing current working area */

	/* set up drawing, by hiding mouse and setting clipping on */
	graf_mouse (M_OFF, 0L);
	set_clip (true, clip);
	wind_get (wd->handle, WF_WORKXYWH, &wrkx, &wrky, &wrkw, &wrkh);

	/* clears the display */
	vsf_color (app_handle, WHITE);
	pxy[0] = wrkx;
	pxy[1] = wrky;
	pxy[2] = wrkx + wrkw - 1;
	pxy[3] = wrky + wrkh - 1;
	vr_recfl (app_handle, pxy);

	/* draws our specific code */
	draw_example (app_handle, wd);

	/* tidies up */
	set_clip (false, clip);
	graf_mouse (M_ON, 0L);
}| Hide the mouse, set clipping on, and find the work area. | |
| Clear the work area. | |
| Call out to our drawing code. | |
| Set clipping off, and restore the mouse. |
5.2. Updating a Display
One of the technically more complex aspects of handling windows in GEM is the concept of the rectangle list, and how to manage it. In essence, the idea is very simple. Assume our program’s window is obscured by several windows. One of these windows is closed. Our program will be told to redraw the area which was underneath the window which has now closed.
However, we cannot blindly fill that area with the contents of our window, because there may be other windows partially obscuring this area. Hence, we must take a look at every other window on the system, find those which are obscuring our window, and make sure we avoid drawing over them.
For example, consider the following two images. In the first image, we have three windows,all overlapping each other. We now close the top window: how should the back window, the one showing the list "Classic 1" etc, be updated?
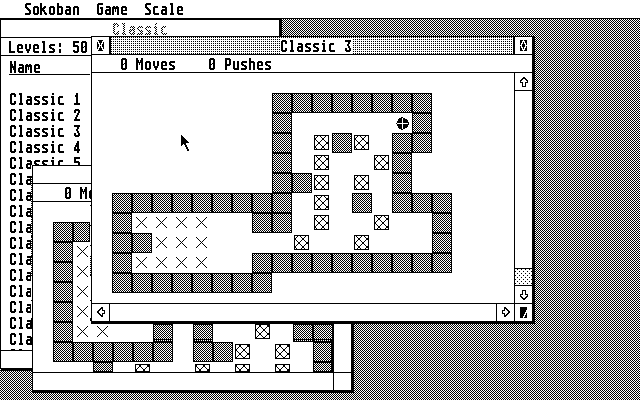
The second image shows the scene with the top window closed. The highlighted rectangle indicates the area that needs to be redrawn, and only this area. If we redraw any other parts of the bottom window, we will overwrite the contents of the window now on top.
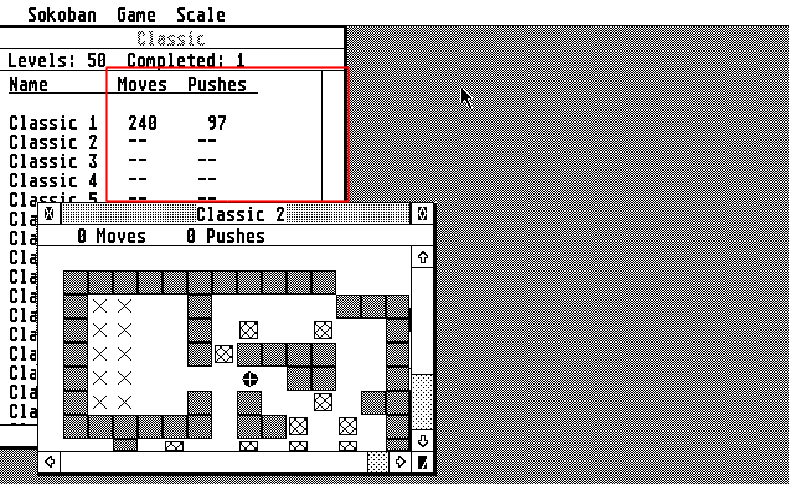
The process to ensure we only update the required areas is called "walking the rectangle list". Our application receives the total area that was revealed by closing the top window, and which needs updating. Our application compares that area to the other windows that are obscuring it, before locating the highlighted rectangle to draw.
Walking the rectangle list is controlled by two get operations:
-
wind_get (wd→handle, WF_FIRSTXYWH, …)retrieves the first rectangle relevant to our window, storing the x, y, w, h values in the remaining reference parameters. -
wind_get (wd→handle, WF_NEXTXYWH, …)retrieves the next rectangle, again storing the x, y, w, h values in the remaining reference parameters.
This continues while the w and h values retrieved are non-zero values: when they are both zero, we have reached the end of the rectangle list.
All we check is whether the rectangles in the list intersect our rectangle to update and, if so, we draw the intersected area.
/* Called when application asked to redraw parts of its display.
   Walks the rectangle list, redrawing the relevant part of the window.
 */
void do_redraw (struct win_data * wd, GRECT * rec1) {
	GRECT rec2;

	wind_update (BEG_UPDATE);

	wind_get (wd->handle, WF_FIRSTXYWH,
		  &rec2.g_x, &rec2.g_y, &rec2.g_w, &rec2.g_h);
	while (rec2.g_w && rec2.g_h) {
		if (rc_intersect (rec1, &rec2)) {
			draw_interior (wd, rec2);
		}
		wind_get (wd->handle, WF_NEXTXYWH,
			  &rec2.g_x, &rec2.g_y, &rec2.g_w, &rec2.g_h);
	}

	wind_update (END_UPDATE);
}
}| Turn off all other window updates, while we update our window contents. | |
| Retrieve the first rectangle to update. | |
| We now loop, while there is a rectangle that needs updating. | |
| Check if the rectangle to update intersects the part of the display we have to update. | |
| Draw our window only in the area intersecting the two rectangles. | |
| Retrieve the next rectangle to update. | |
| Turn back on other window updates. |
(Note that rc_intersect is provided within AHCC’s library.)
5.3. Responding to REDRAW Events
What does the AES do when it thinks our window needs updating? It sends us a REDRAW event. Along with the event, it tells us the handle of the window we need to update, and also a rectangle: this rectangle is the area of our window it wants us to update.
For a redraw event, we receive the following information in msg_buf:
-
msg_buf[0] = WM_REDRAW, the type of event.
-
msg_buf[3] = handle of window which must be redrawn.
-
msg_buf[4] = x coordinate of area to redraw.
-
msg_buf[5] = y coordinate of area to redraw.
-
msg_buf[6] = width of area to redraw, in pixels.
-
msg_buf[7] = height of area to redraw, in pixels.
do {
	evnt_mesag (msg_buf);

	switch (msg_buf[0]) {
		case WM_REDRAW:
			do_redraw (wd, (GRECT *)&msg_buf[4]);
			break;
	}
} while (msg_buf[0] != WM_CLOSED);| We use a switch statement to select the action to respond to, based on the type of event. | |
| The type for a redraw event. | |
We simply call our do_redraw function. As we only have one window
in this program, we can pass its window data directly. Notice how
the x, y, w, h coordinates in msg_buf[4,5,6,7] are turned into the
GRECT type. |
This part of the program does a lot of hard work. To recap, every time
our program must redraw part of its screen, it will receive a REDRAW
event, containing the window handle and screen area to redraw. We pass
these to do_redraw which walks the rectangle list, ensuring we draw on only
those parts of the window which are not obscured by other windows in the
operating system. do_redraw then calls, for each unobscured rectangle,
draw_interior, which sets the clipping region to the unobscured rectangle
and draws our application’s data into just that region.
The good news is two-fold. First, having written all this code, it will
probably be pretty-much the same for any GEM program. The main part you
need to change is draw_example, or its equivalent. Second, this sequence
is called every time the computer thinks you need to update the screen,
and so you don’t have to do anything extra to keep the window updated in
many cases. In particular, your program will receive a REDRAW event when
it starts up, which means we can delete the call to draw_example we had
in start_program.
5.4. Sample Program: Version 2
This version includes the REDRAW events, walking the rectangle list, and the code to clear the display background. When you run the code, the display should now look a lot better. Try dragging another window over the top of your program: notice how the display updates itself, keeping your window’s display exactly as you want it.
However, it is now time to use some of the other possible window controls, and manage the events they trigger.
6. Simple Window Events: Top and Move
The first two events we will handle are straightforward, as we can rely on the AES to do the necessary work. These two events are triggered when our window is brought to the top of the screen, or when our window is moved to a different location.
6.1. TOP
When several windows are open, only one is "on top". You can bring a window to the top by clicking on it, or if it is "behind" another window which is closed.
When our window is brought to the top, our application is sent the message
WM_TOPPED. The handle of our window is provided in msg_buf. All we need
to do is use wind_set to bring our window to the top.
In our event loop, we add the following code:
case WM_TOPPED:
	wind_set (msg_buf[3], WF_TOP, 0, 0);
	break;
You may wonder how a window that has been partially obscured by another window will be redrawn when you bring it to the top. The answer is that I lied a little when I said all we need to do is the above: AES will trigger a REDRAW event for a window, when you set it to the top, so our program will have to redraw the window contents. However, as we already handle REDRAW events, we have nothing else to do - our previous code and AES do everything for us already.
6.2. MOVE
Windows can be moved, usually, by holding the top bar and dragging them. For this to be available, you need to include the MOVER option in the parts list for your window when you create it (see the section on creating windows).
When our window is moved, all we need to do is set the window’s coordinates to the
new location. The new location is provided in msg_buf, positions 4-7.
In our event loop, we add the following code:
case WM_MOVED:
	wind_set (msg_buf[3], WF_CURRXYWH, msg_buf[4],
		msg_buf[5], msg_buf[6], msg_buf[7]);
	break;
The AES copies our window’s contents directly to its new location. (The AES also sends redraw messages to any windows which our window was obscuring - but we can ignore those.)
We do, however, have to look more closely at our drawing code, now that
the window can move anywhere on the screen. Remember that the code that draws
on the screen does so through the VDI, and we do not provide any reference to
our window when we do so. When we move our window, we need to draw the
contents of our window in a different location. To do this, we pass the
coordinates of where we want the contents drawn to our draw function. The
provided x,y coordinates then represent the origin we need to use for our
drawing code. We pass these coordinates to our drawing code from draw_interior.
void draw_example (int app_handle, struct win_data * wd, int x, int y, int w, int h) {

	v_gtext (app_handle, x+10, y+60, wd->text);

}| We offset the drawing location by the x, y position of the window. |
6.3. Sample Program: Version 3
Version 3 now includes these two events. Notice also the inclusion of MOVER
when the window is created, and the updated draw_example and draw_interior
functions.
Our window is now a respectable GEM program. It redraws itself when requested, does not disturb any other windows in the system, can be moved around the screen and brought back to the top. If you are content with a fixed size window, you now have enough to implement a GEM application.
7. Changing the Window Size: Full and Resize
The next two window controls we will look at are used to alter the size of the window. The first, the FULLER, allows us to make the window its maximum size. Clicking the FULLER a second time will restore the window to its previous size. The second is the SIZER, which enables us to dynamically alter the window size to whichever dimensions we wish.
Both these controls rely on the wind_set command to set the current x, y, w, h,
dimensions of the window.
7.1. FULLER
The FULL widget is used to expand our window to its maximum size. This maximum
size was set when you created the window, but is usually the extent of the
desktop: using WF_FULLXYWH in a call to wind_set will retrieve this
maximum size.
Once fulled, a window can be restored by again clicking the FULL widget. The
AES enables us to retrieve the previous dimensions of a window using
WF_PREVXYWH in a call to wind_get.
Fortunately, the AES will ensure the display is kept updated, in two ways. First, if the window is just made smaller, then nothing needs updating in your program, as the display has simply been truncated. Second, if the window is made full, it becomes larger, so a REDRAW event is sent to your application, to redraw the new rectangle(s). As we already handle these events, nothing extra is needed.
The function to handle the fulled event is as follows. It is divided into
two parts: if the window is already full, then we need to retrieve its previous
size and set the current window size to those older values. If the window
is not already full, then we need to retrieve the maximum size, and set the
current window size to the maximum (full) values. In addition, it is
traditional to display a little animation of the window growing or shrinking
to its new size, hence the calls to graf_shrinkbox. (This may not be visible
on a fast computer: I can’t detect them on the Firebee!)
void do_fulled (struct win_data * wd) {
	if (is_full_window (wd)) { /* it's full, so shrink to previous size */
		int oldx, oldy, oldw, oldh;
		int fullx, fully, fullw, fullh;

		wind_get (wd->handle, WF_PREVXYWH, &oldx, &oldy, &oldw, &oldh);
		wind_get (wd->handle, WF_FULLXYWH, &fullx, &fully, &fullw, &fullh);
		graf_shrinkbox (oldx, oldy, oldw, oldh, fullx, fully, fullw, fullh);
		wind_set (wd->handle, WF_CURRXYWH, oldx, oldy, oldw, oldh);

	} else { /* make full size */
		int curx, cury, curw, curh;
		int fullx, fully, fullw, fullh;

		wind_get (wd->handle, WF_CURRXYWH, &curx, &cury, &curw, &curh);
		wind_get (wd->handle, WF_FULLXYWH, &fullx, &fully, &fullw, &fullh);
		graf_growbox (curx, cury, curw, curh, fullx, fully, fullw, fullh);
		wind_set (wd->handle, WF_CURRXYWH, fullx, fully, fullw, fullh);
	}
}| Find the previous dimensions of the window. | |
| Find the maximum dimensions of the window. | |
| Draw a little animation of the shrinking window. | |
| Set the window size to the previous dimensions. |
Notice the function is_full_window, which returns true if the window is
currently at its maximum size. This function merely checks the current and
full dimensions of the window, to see if they are the same. The function is:
bool is_full_window (struct win_data * wd) {
	int curx, cury, curw, curh;
	int fullx, fully, fullw, fullh;

	wind_get (wd->handle, WF_CURRXYWH, &curx, &cury, &curw, &curh);
	wind_get (wd->handle, WF_FULLXYWH, &fullx, &fully, &fullw, &fullh);
	if (curx != fullx || cury != fully || curw != fullw || curh != fullh) {
		return false;
	} else {
		return true;
	}
}
Finally, to respond to size events, include WM_FULLED in the event loop, as follows:
case WM_FULLED:
	do_fulled (wd);
	break;
7.2. SIZER
The sizer allows the user to adjust the window dimensions to any size she
chooses. The AES will tell your application when the sizer has been adjusted,
and also tell you the new size of the window (in msg_buf). Your program
must alter the size of the window, and make any other adjustments required to
make the window contents suit its new size (this is particularly important
when you have sliders as well, for which see the next section).
Fortunately, the AES will ensure the display is kept updated, just as with the fulled event, above.
The code to actually resize our window is, at this stage, simple. All we need to do is set the current dimensions of the window to the new size. We add a simple check that the new dimensions are not too small, so the user cannot reduce the window beyond a given minimum.
void do_sized (struct win_data * wd, int * msg_buf) {
	if (msg_buf[6] < MIN_WIDTH) msg_buf[6] = MIN_WIDTH;
	if (msg_buf[7] < MIN_HEIGHT) msg_buf[7] = MIN_HEIGHT;

	wind_set (wd->handle, WF_CURRXYWH,
		  msg_buf[4], msg_buf[5], msg_buf[6], msg_buf[7]);
}| To prevent the user sizing our window out of existence, we check that the new width and height won’t be too small. The minimum dimensions are defined in "windows.h". | |
| All we need to do is set our window’s current x, y, w, h to the new size. |
To respond to size events, include WM_SIZED in the event loop, as follows:
case WM_SIZED:
	do_sized (wd, msg_buf);
	break;
Pass the window and the message buffer to do_sized. |
7.3. Sample Program: Version 4
Version 4 now supports more of the window’s widgets: you can resize the window using the button at the bottom-right, and also make the window switch between full screen and its original size.
To make the display more interesting, the window contains several lines of a poem. You need to resize the window to see more of the poem. How much you can see will depend on the size of your screen. To see the rest of the poem, we somehow need to move the window "over" the poem being displayed - this introduces our next topic, sliders.
8. Sliding across Window Contents
The sliders are what give the illusion of windows looking onto a wider space of data. Sliders are complicated to handle, as users have many ways of interacting with them. A slider can be dragged directly. Users can click on the arrows, or in the slider bar. As there are two sliders, this makes for ten functions just to handle the sliders. In addition, when a window is resized or made full, or if the window’s contents change, its dimensions change, and so the positions and size of the sliders must be changed as well.
I will cover the code for sliders and arrows in one go, as it is all related. Also, the vertical and horizontal sliders are essentially the same, code wise, so I shall mainly present code for the vertical slider here: code for the horizontal slider is similar, and contained in the example code.
Because of the large number of events that need handling (10 in total), this part of your program will be the most extensive, and the most complicated. Adding sliders also requires consideration when drawing the contents of the screen.
We shall begin by adding sliders to our program, getting the sliders to show
the right size and position, then we modify draw_example to display things
correctly, before finally seeing how to respond to all the events.
8.1. Showing the Sliders
Adding the sliders and arrows is done in the parts list when creating our window. We need to add the slider and its two arrows. A complete parts list, including all the previously mentioned windows widgets, is:
NAME|CLOSER|FULLER|MOVER|SIZER|UPARROW|DNARROW|VSLIDE|LFARROW|RTARROW|HSLIDE
The AES makes some space for the sliders, as with the other window widgets, and
leaves the remaining room for us to draw in. This is why, when doing operations
such as FULL, we use WF_CURRXYWH to get or set the current window dimensions,
but, for drawing within the window, we use WF_WORKXYWH to get the current
working area of the window.
8.2. Setting the Sliders
Each slider has two parameters: its size and its position. The size must reflect the portion of the window contents we can currently see. The position must reflect where our current window contents are, in relation to the whole.
Before we can start, we need to decide a few details about what our window will be displaying, and how using the sliders will affect what is displayed. For example, for a window displaying text, we would expect a click on the down arrow to move the display up by a single line of text. A click on page down would move the display up by a page of text, moving the currently bottom line to the top of the screen. The vertical slider should reflect the number of lines of text displayed in proportion to the total number of lines available to display. Similarly, the horizontal arrows would move the text by a character, in either direction.
Hence, the first two details we need to decide are the size of a vertical step, and the size of a horizontal step. For a text display, this will be the height and width of a character, respectively. For graphical displays, other kinds of step size might be appropriate: in the Sokoban program (see later), I chose the size of a displayed cell as the step size; when displaying an image, perhaps a single pixel would be the required step size.
This step size is an important feature of the window: I store it in the
win_data structure, and set it when creating the window.
Four other items of information are also stored in win_data. These are:
-
the total number of lines shown (the vertical height of the display);
-
the maximum number of characters in a line (the horizontal width of the display);
-
the current vertical position, the number of lines down in the display; and
-
the current horizontal position, the number of characters across in the display.
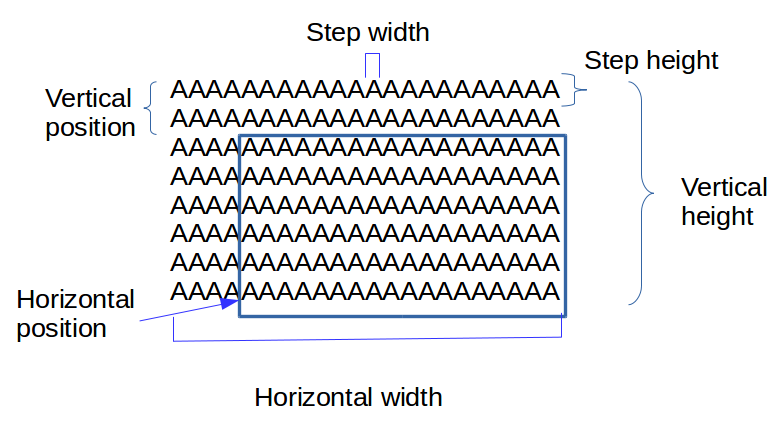
These size items are added to win_data as follows:
struct win_data {
	int handle; /* window handle */

	int lines_shown; /* number of lines shown in current display */
	int colns_shown; /* number of columns shown in current display (longest line) */
	int vert_posn; /* number of lines down of vertical scroll bar */
	int horz_posn; /* number of characters from left of horizontal scroll bar */

	int cell_h; /* height of char/cell in window */
	int cell_w; /* width of char/cell in window */

	/* REMAINING SLOTS NOT SHOWN */
}
The following diagram illustrates each of these six slots (the blue rectangle illustrates the displayed window onto the background text):
The size of a slider must indicate the proportion of text actually shown against the total amount of text that could be shown. In our example, the poem has a number of lines to it. If all of the poem is showing in the window, then the vertical slider must be at its maximum - there is nothing to scroll. If however the window is shorter, so only some of the lines are showing, then the slider size must reflect the proportion of text showing against the total number of lines in the poem. Similar considerations apply to the horizontal slider.
The following function returns a number from 0 to 1000 based on the required size of the slider. This is calculated based on the number of lines or characters available (which the size of window would permit) and the number of lines or characters actually shown (which are displayed by the draw code).
int slider_size (int num_available, int num_shown) {
	int result;

	/* in case number shown is smaller than those available */
	if (num_available >= num_shown) { /* all visible */
		result = 1000; /* so slider complete */
	} else {
		result = (1000 * (long)num_available) / num_shown;	//
	}

	return result;
}| Check if all the display will fit in the window: result is 1000 if so. | |
| Otherwise, find the fraction of 1000, using long multiplication for accuracy. |
The position of the slider depends on three parameters: the number of lines or characters available, the number shown, and the current offset from the top or left. Again, if the number available exceeds the number to be shown, then the slider is simply at position 0 (the top or left).
Before working out the proportion, we need to compute the "scrollable region". This is the number of positions along which the slider can move. For example, if we have a 500 line text, and 50 lines can be displayed at a time, the top line can be moved from line 1 to line 450: so the scrollable region for the vertical slider is 450 lines.
The position of the slider is then computed as 1000 * offset / scrollable_region.
As the ST does not support floating point calculations, the code below computes that fraction using integer division and modulus, and can be used everywhere.
int slider_posn (int num_available, int num_shown, int offset) {
	int result;

	/* in case number shown is smaller than those available */
	if (num_available >= num_shown) { /* all visible */
		result = 0; /* so slider complete, and show bar at top position */
	} else {
		/* number of positions scrollbar can move across: must be positive due to above check */
		int scrollable_region = num_shown - num_available;
		int tmp1 = offset / scrollable_region;
		int tmp2 = offset % scrollable_region;

		result = (1000 * (long)tmp1) + ((1000 * (long)tmp2) / scrollable_region);
	}

	return result;
}
Given the above two functions, it is now straightforward to update the sliders.
Our function simply finds the available numbers of lines and columns, based
on the work area of the screen, and then each slider size and position can be
updated. The offset to the sliders is recorded in wd→vert_posn and wd→horz_posn:
these will be updated when the events, such as moving down a line, are processed.
void update_sliders (struct win_data * wd) {
	int lines_avail, cols_avail;
	int wrkx, wrky, wrkw, wrkh;

	wind_get (wd->handle, WF_WORKXYWH, &wrkx, &wrky, &wrkw, &wrkh);
	lines_avail = wrkh / wd->cell_h;	  //
	cols_avail = wrkw / wd->cell_w;		  //

 	/* handle vertical slider */
	wind_set (wd->handle, WF_VSLSIZE,
		  slider_size (lines_avail, wd->lines_shown), 0, 0, 0);
	wind_set (wd->handle, WF_VSLIDE,
		  slider_posn (lines_avail, wd->lines_shown, wd->vert_posn), 0, 0, 0);

	/* handle horizontal slider */
	wind_set (wd->handle, WF_HSLSIZE,
		  slider_size (cols_avail, wd->colns_shown), 0, 0, 0);
	wind_set (wd->handle, WF_HSLIDE,
		  slider_posn (cols_avail, wd->colns_shown, wd->horz_posn), 0, 0, 0);
}| Find the number of lines available to show in the current window, by dividing the current height by the number of pixels in a given line. | |
| Find the number of columns available to show in the current window, by dividing the current width by the number of pixels in a given character. | |
| Update the vertical slider size and position. | |
| Update the horizontal slider size and position. |
8.3. Drawing a Window with Sliders
There is no point having sliders if our window contents do not respond to the position of the sliders. In addition, our drawing code must record the amount of vertical and horizontal space taken up by the contents, to use when setting the size and position of the sliders.
To record the amount of space taken up by the contents, I update the number of lines shown every time a line of text is shown, and the number of columns shown by the maximum width of text.
The vertical slider position is accounted for by ignoring the number of lines in the display equal to the slider position.
The horizontal slider position is accounted for by printing the text offset to the left by the slider position.
Note, I don’t worry about text being displayed off screen, as this is taken care
of by the clipping, set in draw_interior.
void draw_example (int app_handle, struct win_data * wd, int x, int y, int w, int h) {
int i = 0;
int lines_to_ignore = wd->vert_posn;
int cur_y = y + wd->cell_h;
wd->lines_shown = 0;
wd->colns_shown = 0;
while (wd->poem[i] != 0) {
if (lines_to_ignore == 0) {
v_gtext (app_handle, x+wd->cell_w*(1-wd->horz_posn), cur_y, wd->poem[i]);
if (strlen(wd->poem[i])+2 > wd->colns_shown) {
wd->colns_shown = strlen (wd->poem[i]) + 2;
}
cur_y += wd->cell_h;
} else {
lines_to_ignore -= 1;  }
wd->lines_shown += 1;
}
wd->lines_shown += 1;  i = i + 1;
}
}
i = i + 1;
}
}| We have to leave out the lines above the current vertical slider position. | |
| The next y position in the window at which to display text. | |
| Clear the current lines shown in the display (height). | |
| Clear the current columns shown in the display (width). | |
| When we have ignored the lines above the current vertical slider position, we can display the next line of text. | |
| Update the current columns shown if the current line is wider. | |
| Move the y position down a line. | |
| Otherwise, reduce the number of lines to ignore by 1. | |
| Increase the number of lines shown in the display. |
The display of the window contents will depend on your window. The example above is suitable for lines of text. For a graphical display, you may have a fixed size for the window, which means some of the calculations can be simplified.
8.4. Updating the Sliders
The sliders must be checked and changed whenever the window size or contents
are altered. In practice, we need only alter the sliders when we update the
contents of the window. The most suitable place for this is at the end of
draw_interior.
void draw_interior (struct win_data * wd, GRECT clip) {

	/* REST OF FUNCTION */

	set_clip (false, clip);
	update_sliders (wd);
	graf_mouse (M_ON, 0L);
}| Call the function to update the sliders size and position, based on the revised height and width of the displayed contents. |
The sliders need adapting also whenever the window size changes. We do this
within do_sized by changing the horz_posn and vert_posn values to
reflect the change in size of the window. If, for example, a window is made
larger, then it will display more information, and we can reduce the number
of lines off the top of the window.
The sliders themselves will be updated automatically as setting a new window size will trigger a redraw event, which also updates the slider sizes and positions. Unfortunately, that redraw event will only apply to the newly exposed parts of the window: if we have moved the horizontal or vertical position, then all the contents will need redrawing, and we will need to trigger that redraw ourselves.
void do_sized (struct win_data * wd, int * msg_buf) {
	int new_height, new_width;
	bool changed;

	if (msg_buf[6] < MIN_WIDTH) msg_buf[6] = MIN_WIDTH;
	if (msg_buf[7] < MIN_HEIGHT) msg_buf[7] = MIN_HEIGHT;

	//
	new_height = (msg_buf[7] / wd->cell_h) + 1; /* find new height in characters */
	new_width = (msg_buf[6] / wd->cell_w) + 1;  /* find new width in characters */

	/* if new height is bigger than lines_shown - vert_posn,
	   we can decrease vert_posn to show more lines */
	if (new_height > wd->lines_shown - wd->vert_posn) {
		wd->vert_posn -= new_height - (wd->lines_shown - wd->vert_posn);
		if (wd->vert_posn < 0) wd->vert_posn = 0;
		changed = true;
	}
	/* if new height is less than lines_shown - vert_posn,
	   we leave vertical position in same place,
	   so nothing has to be done */

	/* similarly, if new width is bigger than colns_shown - horz_posn,
	   we can decrease horz_posn to show more columns */
	if (new_width > wd->colns_shown - wd->horz_posn) {
		wd->horz_posn -= new_width - (wd->colns_shown - wd->horz_posn);
		if (wd->horz_posn < 0) wd->horz_posn = 0;
	}

	wind_set (wd->handle, WF_CURRXYWH,
		  msg_buf[4], msg_buf[5], msg_buf[6], msg_buf[7]);

	if (changed) {
		GRECT rec;

		wind_get (wd->handle, WF_WORKXYWH,
			  &rec.g_x, &rec.g_y, &rec.g_w, &rec.g_h);
		do_redraw (wd, &rec);
	}
}| Introduce a flag to indicate if the top or side of display has changed. | |
new_height and new_width are the number of characters that will fit
vertically and horizontally in the new window size. |
|
| If the height has increased, we can show more lines, and so reduce the number of lines off the top of the window. | |
| Set the flag to trigger an update, as the top of the display has moved. | |
| If the height has decreased, we leave the top line where it is. | |
| Similarly, alter the left column only if the window has got wider. | |
| Setting the new window size will trigger a redraw event, updating the new part of the display and sliders, if required. | |
| Request a redraw of the entire window. |
8.5. Slider Events
The sliders can be moved directly, by dragging them with the mouse. These
events have their own message type, one for the vertical and one for the
horizontal slider. msg_buf[4] contains the new position of the slider, as
a number between 0 (top/left) and 1000 (bottom/right).
case WM_VSLID:
	wind_set (msg_buf[3], WF_TOP, 0, 0);
	do_vslide (wd, msg_buf[4]);
	break;

case WM_HSLID:
	wind_set (msg_buf[3], WF_TOP, 0, 0);
	do_hslide (wd, msg_buf[4]);
break;| I force the window to the top when moving the slider: in Mint, it is possible to grab the slider and move it, leaving the window in the background. I think this is a flaw, hence the forced top. | |
| Call the code to handle the slider, along with its new position. |
The code to handle the slider update requires us to compute any change to the top line. The new vertical position reflects the location of the new slider position along the scrollable region.
void do_vslide (struct win_data * wd, int posn) {
	GRECT r;
	int lines_avail;

	wind_get (wd->handle, WF_WORKXYWH, &r.g_x, &r.g_y, &r.g_w, &r.g_h);
	lines_avail = r.g_h / wd->cell_h;
	wd->vert_posn = (posn * (long)(wd->lines_shown - lines_avail)) / 1000;
	if (wd->vert_posn < 0) wd->vert_posn = 0;
	wind_set (wd->handle, WF_VSLIDE, posn, 0, 0, 0);
	do_redraw (wd, &r);
}| Find the new number of lines available. | |
| Compute the new vertical position in the displayed text. | |
| Ensure this new position is valid. | |
| Update the position of the vertical slider. | |
| Redraw the contents of the window (this is not automatic). |
The code for handling the horizontal slider is very similar.
8.6. Arrow Events
The remaining events are all known as "arrow" events: the AES sends the
application a message that an arrow event has occurred, and passes the
arrow type in msg_buf[4].
case WM_ARROWED:
	wind_set (msg_buf[3], WF_TOP, 0, 0); /* bring to the top */
	do_arrow (wd, msg_buf[4]);
break;| As with the sliders, we force the window to the top if the arrows are used. | |
| Call out to the arrow handling code, with the arrow type as a parameter. |
do_arrow simply calls the appropriate function based on the arrow type.
There are 8 arrow types. In each slider we can move in either direction by one step, or by a "page". The horizontal slider arrow events are handled identically to the vertical ones, except with the obvious change in orientation. For the vertical slider, the move up or move down is again the same, except for minor changes. I shall describe here just the UPLINE event, which moves the window down by a single step, and the UPPAGE event, which moves the window down by a whole page of text. We start with UPPAGE, which is simpler:
/* This function is called in response to WA_UPPAGE arrow type */
void do_uppage (struct win_data * wd) {
	GRECT r;
	int lines_avail;

	wind_get (wd->handle, WF_WORKXYWH, &r.g_x, &r.g_y, &r.g_w, &r.g_h);
	lines_avail = r.g_h / wd->cell_h;
	wd->vert_posn -= lines_avail;
	if (wd->vert_posn < 0) wd->vert_posn = 0;
	do_redraw (wd, &r);
}| Compute the amount of text available on the screen in the vertical direction. | |
| Alter the vertical position by a screenful of text. | |
| Check we have not gone too far: 0 is the top. | |
| Redraw the window contents. |
We could, in theory, treat UPLINE in an identical manner. Instead of changing
wd→vert_posn by a page of text, we would change it by 1. The only
aesthetic problem is that it makes the display flicker: there is a
better technique, which gives smooth scrolling. The better technique copies
the unchanged, existing image down by one line, and then simply redraws the new
exposed line.
The following function uses this better technique. The first four lines
compute the new vert_posn in the same way as for do_uppage. We then
set up a call to vro_cpyfm. This VDI function copies screen data from
one place to another. In pxy[0-3] we place the location of the start
display, and in pxy[4-7] we place the location of the end display, which
is the same location but one line down. Finally, we adjust the rectangle
so we redraw just the top, exposed parts of the display.
/* This function is called in response to WA_UPLINE arrow type */
void do_upline (struct win_data * wd) {
	FDB s, d;
	GRECT r;
	int pxy[8];

	if (wd->vert_posn == 0) return; /* already at top of screen */
	wind_get (wd->handle, WF_WORKXYWH, &r.g_x, &r.g_y, &r.g_w, &r.g_h);
	wd->vert_posn -= 1;
	if (wd->vert_posn < 0) wd->vert_posn = 0;

	set_clip (true, r);
	graf_mouse (M_OFF, 0L);
	s.fd_addr = 0L;
	d.fd_addr = 0L;
	pxy[0] = r.g_x;
	pxy[1] = r.g_y + 1;
	pxy[2] = r.g_x + r.g_w;
	pxy[3] = r.g_y + r.g_h - wd->cell_h - 1;
	pxy[4] = r.g_x;
	pxy[5] = r.g_y + wd->cell_h + 1;
	pxy[6] = r.g_x + r.g_w;
	pxy[7] = r.g_y + r.g_h - 1;
	vro_cpyfm (app_handle, S_ONLY, pxy, &s, &d);

	graf_mouse (M_ON, 0L);
	set_clip (false, r);

	r.g_h = 2*wd->cell_h; /* draw the height of two rows at top */
	do_redraw (wd, &r);
}
}| If we are already at the top of the screen, there is nothing to do, so return. | |
| The copy affects the screen, so set a clip region to our window, and disable the mouse. | |
| Top left of work area. | |
| Bottom right of work area, less one row. | |
| New top left area, which is original top left down one row. | |
| Bottom right or work area. | |
| Perform the move on the screen. | |
| Enable the mouse, and remove the clip region. | |
| Constrain the redraw to the top two rows. | |
| Redraw the exposed display area. |
The above two functions are repeated four times, for the four different
directions of movement. See the source code for all the variations, and
also do_arrow.
8.7. Sample Program: Version 5
This version includes all the functions required for handling the sliders. As can be seen by comparing versions 4 and 5, the code for the sliders dominates the final program: version 4 has approximately 240 lines of code, whereas version 5 has around 550 lines, more than double the size.
9. Multi-Window Programming
So far, we have managed the display of a single window. Managing more than one window is not much different and, thanks to the structure we’ve used above, requires relatively few changes to the earlier code.
9.1. The Window List
The critical change is to make the win_data structure a list of instances
of such structures. We achieve this by adding a single field to win_data,
which is a pointer to the next window in the list:
struct win_data {
	int handle;	/* identifying handle of the window */

	/* OTHER SLOTS */

	struct win_data * next; /* pointer to next item in list */
};| The added slot provides a pointer to the next item in the list. |
As we create each window, we add its pointer to the end of the current window
list. In our example I create the three windows inside start_program; for
a larger program, you may want to put this in a separate window-creation
function.
void start_program (void) {
	struct win_data wd1;
	struct win_data wd2;
	struct win_data wd3;
	int dum, fullx, fully, fullw, fullh;

	graf_mouse (ARROW, 0L); /* ensure mouse is an arrow */
	wind_get (0, WF_WORKXYWH, &fullx, &fully, &fullw, &fullh);

	/* 1. set up and open our first window */
	wd1.handle = wind_create (NAME|CLOSER|FULLER|MOVER|SIZER, fullx, fully, fullw, fullh);
	wind_set (wd1.handle, WF_NAME, "Example: Version 6 - Blake", 0, 0);
	wind_open (wd1.handle, fullx, fully, 300, 200);
	wd1.poem = poem1;
	wd1.next = NULL;

	wd1.horz_posn = 0;
	wd1.vert_posn = 0;
	vst_point (app_handle, 11, &dum, &dum, &wd1.cell_w, &wd1.cell_h);

	/* set up and open our second window */
	wd2.handle = wind_create (NAME|CLOSER|FULLER|MOVER|SIZER, fullx, fully, fullw, fullh);
	wind_set (wd2.handle, WF_NAME, "Example: Version 6 - Keats", 0, 0);
	wind_open (wd2.handle, fullx, fully, 300, 200);
	wd2.poem = poem2;
	wd2.next = NULL;

	wd2.horz_posn = 0;
	wd2.vert_posn = 0;
	vst_point (app_handle, 11, &dum, &dum, &wd2.cell_w, &wd2.cell_h);

	wd3.horz_posn = 0;
	wd3.vert_posn = 0;
	vst_point (app_handle, 11, &dum, &dum, &wd3.cell_w, &wd3.cell_h);

	/* add second window to end of list */
	wd1.next = &wd2;

	/* set up and open our third window */
	wd3.handle = wind_create (NAME|CLOSER|FULLER|MOVER|SIZER, fullx, fully, fullw, fullh);
	wind_set (wd3.handle, WF_NAME, "Example: Version 6 - Wordsworth", 0, 0);
	wind_open (wd3.handle, fullx, fully, 300, 200);
	wd3.poem = poem3;
	wd3.next = NULL;

	/* add second window to end of list */
	wd1.next->next = &wd3;

	/* 2. process events for our window */
	event_loop (&wd1);

	/* 3. close and remove our windows */
	wind_close (wd1.handle);
	wind_delete (wd1.handle);
	wind_close (wd2.handle);
	wind_delete (wd2.handle);
	wind_close (wd3.handle);
	wind_delete (wd3.handle);
}
Use wd1 as the head of the list, so attach wd2 to it. |
|
Attach wd3 as the third element of the list, beginning with wd1. |
We still pass the start of the list of windows to event_loop. However now,
because each event could apply to any one of our windows, we must find the
correct instance of win_data for each event. This is done in its own
function, by looking for the window’s handle. The following function simply
walks along the list of win_data instances, until it finds the one with a
handle matching the target handle:
struct win_data * get_win_data (struct win_data * wd, int handle) {
	while (wd != NULL) {
		if (wd->handle == handle) break;
		wd = wd->next;
	}
	return wd;
}| Repeat the search until the end of the list. | |
| When the current handle matches the target handle, end the search. | |
| Move on to the next window in the list. |
Finally, each event which requires an instance of win_data must first find
the correct win_data based on the window handle which triggered the event.
For example, the REDRAW event now looks like:
case WM_REDRAW:
	do_redraw (get_win_data(wd, msg_buf[3]),
		   (GRECT *)&msg_buf[4]);
	break;
Find the win_data corresponding to the window handle which triggered this event. |
The close event may need some care. In this example, clicking close for any window will quit the application. If you wish to have a more dynamic system, with windows that can open and close at arbitrary times, you will need to process the closed event based on the window handle. For an example of doing this see Version 7 of the sample program.
9.2. Sample Program: Version 6
Version 6 provides a display with three displayed poems. Notice how few changes were required to the source code, but the final system is very flexible: each window can be moved, resized and handled separately.
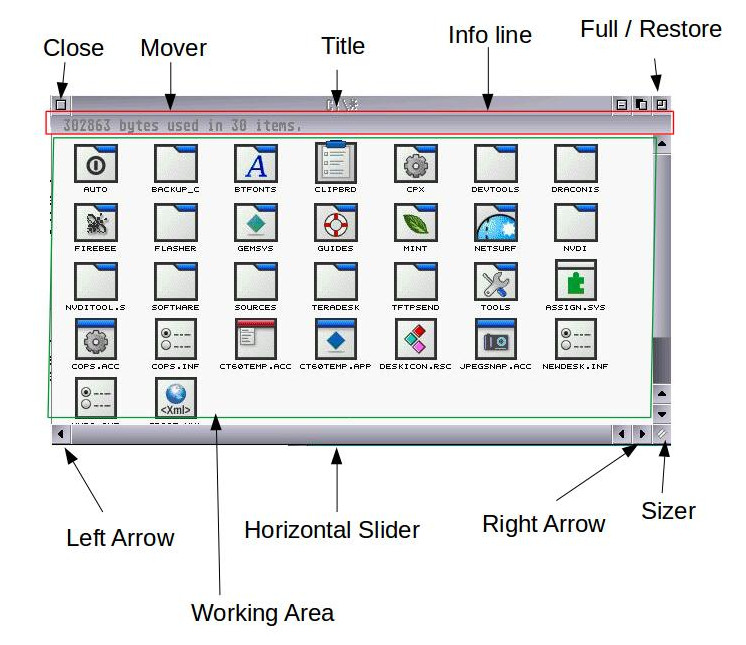
10. The Info Line
This is a simple to use part of the GEM window. The info line can be seen in a standard desktop window: it is the strip that says how many bytes and items there are in the displayed folder.
We can easily use an info line in our program. First, when we create a window,
we must tell it to include the info line by including INFO in the list of parts.
Second, at any point, we can place some contents into the info line.
We could include an info line for our poem display, to hold the number of lines.
Referring to version 5, we would include INFO in the parts for the
window. Then, after the window has been created, we can write:
wind_set (wd->handle, WF_INFO, "57 lines");As with the title, you need to have some dedicated storage for the string passed to info as GEM will use your pointer and not make a copy. Length in GEM is restricted to 80 characters (although most AES replacements extend this).
11. Menus
The menu bar is a convenient way of interacting with our programs. A menu bar is defined within an RSC file, which is a file containing all the resources, such as menu bars and dialogs, used by our program. The RSC file is created by an external program: there are several available, but I use Resource Master 3.65. When started, our program must load in its RSC file, and access the required information to show menu bars and dialogs.
Menus, in GEM, typically appear at the top of the screen. The menu bar can contain several menus. Each menu has a title, and can contain a number of menu items. Each menu item may have an associated key command. Also, menu items may be disabled (meaning they cannot be selected), or have a check mark showing. Menus can also contain separator items, which are horizontal lines to divide the menu into groups. The image below illustrates these elements:

Menus also provide access to the desk accessories. The convention is that the first menu item, on the left, refers to the program name, and contains a single item, which opens a dialog showing information about the program. This first menu item is followed by a separator, and then a list of desk accessories (or "Clients" in Mint).
Interactions with the menu are simple: when a menu item is clicked on with the mouse, a message is sent to the program indicating that the menu has been used. This message contains information about the menu item that was clicked.
Keyboard shortcuts are also an integral part of using menus. In order to handle these, we need to discuss more about event handling, which we do in the following section.
11.1. The RSC and rsh files
Before our program can use a menu, we need to build the menu in a resource construction program (such as Resource Master) and save it as a RSC file. Our program also needs a way of associating the clicked on menu item with the information sent in the message event. This information is contained in a set of symbol definitions, saved by the resource construction program in a .rsh file (or equivalent).
|
|
It is standard practice to name our .RSC file using the program name. Do not use your program name for a .C source file. For example, if your program is 'sokoban', we will have 'sokoban.rsc'. Do not name one of your source files 'sokoban.c'. ResourceMaster, for example, will export a .c file if you choose to build a desk accessory, and this will overwrite any source files of the same name. For safety, only use your program name as the .PRG name in your project file, and as the .RSC name. |
As we create each menu item, we associate with that menu item a symbol, used to name it. When we export the C header file, we get a file containing symbol definitions for each menu item. For Resource Master, the output looks something like the following. Note that the symbol 'ABOUT' attached to the 'About' menu item has been prefixed with the symbol for the main menu itself.
/* Resource C-Header-file v1.95 for ResourceMaster v2.06&up by ARDISOFT */ #define MAIN_MENU 0 /* menu */
| The symbol for the main menu itself. | |
| The symbol for the 'About' item on the main menu. |
Before we can use the RSC file, we need to include the .rsh file in our source code. We do this by adding a line in "windows.h", for example:
#include "version7.rsh"11.2. Showing a Menu
Before we can show the menu, our program must open the .RSC file. We must
check the file has opened successfully before proceeding. Having done
this, we can locate the menu bar and show it. Once our program has
finished, we should remove the menu bar. Our start_program function is
accordingly modified, as follows:
void start_program (void) {
	/* DECLARE LOCAL VARIABLES */

	if (!rsrc_load ("VERSION7.rsc")) {
		form_alert (1, "[1][version7 .rsc file missing!][OK]");
	} else {
		OBJECT * menu_addr;

		/* 1. install the menu bar */
		rsrc_gaddr (R_TREE, MAIN_MENU, &menu_addr);
		menu_bar (menu_addr, true);

		/* 2. OPEN WINDOWS ETC */

		/* 3. process events for our window */
		event_loop (menu_addr, &wd1);

		/* 4. remove the menu bar */
		menu_bar (menu_addr, false);

		/* 5. CLOSE WINDOWS AND CLEAN UP */
	}
}| Attempt to load the RSC file. If it fails to load, display a dialog, and then abort the program. | |
| Create a local variable to hold the address of the menu. | |
Retrieve the menu from the RSC data. We provide the name of the
menu MAIN_MENU, and the variable to store the menu’s address. |
|
| Display the menu bar for our application. | |
menu_addr is also passed to the event_loop. |
|
| Remove the menu bar, which frees up its resources. |
|
|
rsrc_load likes the filename in capital letters.
|
11.3. Responding to Menu Events
Menu events are passed to our program using the MN_SELECTED event type.
msg_buf[4] contains the reference to the actual menu selected. These
references are defined in the .rsh file.
Within the event_loop function switch function, we add the following case
to respond to menu events:
	case MN_SELECTED: /* menu selection */
        	do_menu (wd, msg_buf[4]);
		/* return menu to normal */
        	menu_tnormal (menu_addr, msg_buf[3], true);
		break;
Call out to do_menu with the selected menu item. |
|
| Once the menu event has been dealt with, return the menu display to normal. |
Notice how GEM highlights the selected menu item whilst the event is carried out. Our program is responsible for returning the item to normal once it has finished.
The do_menu function simply dispatches to a function to deal with each
of the possible menu items.
void do_menu (struct win_data * wd, int menu_item) {
	switch (menu_item) {

		case MAIN_MENU_ABOUT:
			do_about ();
			break;
	}
}| The case statement uses the name for the menu item as defined in the RSC file. |
The do_about function displays a simple information dialog - we discuss
dialogs in a later section.
How about the QUIT option? When the user selects quit, we don’t have to
do anything except exit the event loop. This is easily done in the while
condition:
} while (!(msg_buf[0] == MN_SELECTED && msg_buf[4] == MAIN_MENU_QUIT)); Loop terminates when it has a MN_SELECTED event which is 'Quit'. |
11.4. Controlling the Menu Items
An individual menu item can be enabled or disabled. A disabled menu item cannot be selected, and is shown greyed out on the menu bar. Whether a menu item is enabled or not is controlled using:
menu_ienable (menu_addr, OBJECT, flag);where
-
menu_addris the address of the menu; -
OBJECTis the reference to the menu item; and -
flagis true to enable or false to disable the menu item.
Each menu item can also show an optional check (or 'tick') mark
beside it. The code to control this takes the same parameters as
menu_ienable:
menu_icheck (menu_addr, OBJECT, flag);Finally, it is possible to change the text showing on a menu item, with the call:
menu_text (menu_addr, OBJECT, str); str must be a statically allocated string. Remember to keep
two spaces at the start of the string. |
The sample program does not have a good reason to use checked menu items
or to disable items, so there is a menu provided just to try out these
options. One menu item controls whether the other is enabled or not, and
shows a check mark if it is enabled. For good measure, the altered menu item
also has its text changed. We store the state for this as
a global variable, menu_state; in a real application the state will likely
depend on the top-most window’s contents, and so be stored within win_data.
The action is handled directly in do_menu:
	case MAIN_MENU_SWITCH:
		menu_state = !menu_state;
		menu_icheck (menu_addr, MAIN_MENU_SWITCH, menu_state);
		menu_ienable (menu_addr, MAIN_MENU_DUMMY, menu_state);
		menu_text (menu_addr, MAIN_MENU_DUMMY,
			   (menu_state ? "  Enabled" : "   Disabled"));
break;| Invert the state. | |
| Set the status of the SWITCH menu item’s check sign. | |
| Set the enabled/disabled status of the DUMMY menu item. | |
| Change the text on the DUMMY menu item. |
12. Events
This is an appropriate time to consider event handling in more detail, so we can extend the range of events we can respond to. For example, in the last section we considered menus. Important menu items should contain keyboard shortcuts, for users who prefer not to take their hands from the keyboard. Keyboard events are sent to our program just like other events, but we must listen for them. To do so, we must change our event loop to handle multiple event types.
Any GEM program may produce one or more of a range of different event types. These include:
-
MU_MESAG: AES messages for the window and menu events (as we have handled so far) -
Mouse events: information on the mouse, there are three of these
-
MU_M1: When mouse enters or leaves region 1 -
MU_M2: When mouse enters or leaves region 2 -
MU_BUTTON: Information on button clicks
-
-
MU_TIMER: Timer events, an event triggered at regular time intervals -
MU_KEYBD: Keyboard events, triggered when the user types on the keyboard
Although GEM provides separate event listeners for these different types, in any real GEM program multiple event types will be needed. For example, any GEM program will need to respond to AES messages about the windows and menus, mouse events and the keyboard, at a minimum; to do this, we need to use a multiple-event listener.
There are two ways to handle multiple event types. There is the traditional
way, which uses a call to evnt_multi. This requires setting up several
internal variables to store any required return values. AHCC offers an
alternative way, which uses a call to EvntMulti, using a convenient struct
to hold all input and return values. The advantage of evnt_multi is
conformance to previous practice. The advantage of EvntMulti is a simpler
calling routine; the AHCC description also claims improved performance. We
shall describe both ways.
12.1. Traditional evnt_multi
The traditional evnt_multi function is an extension of the evnt_mesag
we have been using so far. It offers the advantage of being documented in
the Atari literature, and will be familiar to most programmers. However,
it does require care in defining and presenting different reference variables
to hold various return values.
The call to evnt_multi looks as follows:
int evnt_multi( int ev_mflags, int ev_mbclicks, int ev_mbmask,
                int ev_mbstate, int ev_mm1flags, int ev_mm1x,
                int ev_mm1y, int ev_mm1width, int ev_mm1height,
                int ev_mm2flags, int ev_mm2x, int ev_mm2y,
                int ev_mm2width, int ev_mm2height,
                int *ev_mmgpbuff, int ev_mtlocount,
                int ev_mthicount, int *ev_mmox, int *ev_mmoy,
                int *ev_mmbutton, int *ev_mmokstate,
                int *ev_mkreturn, int *ev_mbreturn );
Many of these variables define values describing the kinds of events
to listen for. ev_mflags indicates the event types, such as mouse
and keyboard. ev_mbclicks describe the number of clicks that will
trigger an event, etc.
The reference variables (pointers to ints) are used for return values.
For example, ev_mkreturn will hold the code of a pressed key.
ev_mmgpbuff is a pointer to the message buffer for AES messages.
The following is a complete list:
-
ev_mflags: flags indicating which events to listen for
-
ev_mbclicks: number of mouse clicks to listen for
-
ev_mbmask: button mask (for which button)
-
ev_mbstate: button state (0 for up, 1 for down)
-
ev_mm1flags: 1 for leave, 0 for enter region 1
-
ev_mm1x: x coordinate of region 1
-
ev_mm1y: y coordinate of region 1
-
ev_mm1width: width of region 1
-
ev_mm1height: height of region 1
-
ev_mm2flags: 1 for leave, 0 for enter region 2
-
ev_mm2x: x coordinate of region 2
-
ev_mm2y: y coordinate of region 2
-
ev_mm2width: width of region 2
-
ev_mm2height: height of region 2
-
ev_mtlocount: low count for timer event
-
ev_mthicount: high count for timer event (pair is a long value for time in ms)
-
ev_mmox: mouse x coordinate
-
ev_mmoy: mouse y coordinate
-
ev_mmbutton: button state
-
ev_mmokstate: key state (bit 0 right-shift, 1 left-shift, 2 ctrl, 3 alt)
-
ev_mkreturn: holds the code of the pressed key
-
ev_mbreturn: number of clicks
-
ev_mmgpbuf: this is an array of 8 ints, which we have called
msg_buf
The return value from evnt_multi gives the actual event type that occurred.
For example, if we wish to listen for an AES message, mouse click or keyboard
event, we would call evnt_multi with the flags:
result = evnt_multi (MU_MESAG | MU_KEYBD | MU_BUTTON, ...);result would then hold one of the flag values, depending on which event
type occurred.
The following excerpt from version 7 of our sample program illustrates how
evnt_multi is used. In this version we listen for the standard AES messages
regarding the menus and window events, but additionally look out for a
keyboard event:
void event_loop (OBJECT * menu_addr, struct win_data * wd) {
	int msg_buf[8];
	int dum, key, event_type;

	do {
		event_type = evnt_multi (MU_MESAG | MU_KEYBD, 0,0,0,0,0,
                                         0,0,0,0,0,0,0,0,msg_buf,0,0,
					 &dum, &dum, &dum, &dum, &key, &dum);

		/* -- check for and handle keyboard events */
		if (event_type & MU_KEYBD) {
			if (key == 0x1011) { /* code for ctrl-Q  */
				break; /* exit the do-while loop */
			}
		}

		/* -- check for and handle menu events */
		if (event_type & MU_MESAG) {
			switch (msg_buf[0]) {

				case MN_SELECTED: /* menu selection */
					do_menu (menu_addr, wd, msg_buf[4]);
					/* return menu to normal */
					menu_tnormal (menu_addr, msg_buf[3], true);
					break;

				// REMAINING CASE STATEMENTS

			}
		}
	} while ((MN_SELECTED != msg_buf[0]) || (MAIN_MENU_QUIT != msg_buf[4]));
}
Create some variables to hold the values created in evnt_multi.
dum is used for those slots we do not need. |
|
Call evnt_multi with flags for the events we are listening for and
references to the variables to hold results. |
|
Check event_type for the actual event that occurred. |
|
| Use the variables to locate results relevant to each event type. |
12.2. AHCC EvntMulti
AHCC’s custom EvntMulti offers the advantage of a simpler calling routine.
Instead of defining separate variables for the possible return values, we
simply define one instance of EVENT, and pass its address to EvntMulti.
The return values and the msgbuf are all then stored within our instance
of EVENT. (The only small downside is that the slot names are not very
intuitive.)
The struct EVENT has a slot for each of the arguments to evnt_multi, as
discussed above (except that ev_mbmask is called ev_bmask and ev_mmbutton
is called ev_mmobutton). Instead of passing the values by position in the
function call, input values are set and output values are stored in the
relevant slots.
We use EvntMulti just like evnt_multi. First we set the input data for
the events we want to listen for, then we call EvntMulti, and use its
return value to decide which kind of event has occurred. Information about
the event is stored in the relevant output slots of EVENT.
The following excerpt is from our example program, version 7. It does the
same as was done using the evnt_multi call above:
void event_loop (OBJECT * menu_addr, struct win_data * wd) {
	EVENT ev;

	ev.ev_mflags = MU_MESAG | MU_KEYBD;

	do {
		int event_type = EvntMulti (&ev);

		/* -- check for and handle keyboard events */
		if (event_type & MU_KEYBD) {
			if (ev.ev_mkreturn == 0x1011) { /* code for ctrl-Q */
				break; /* exit the do-while loop */
			}
		}

		/* -- check for and handle menu events */
		if (event_type & MU_MESAG) {
			switch (ev.ev_mmgpbuf[0]) {

				case MN_SELECTED: /* menu selection */
					do_menu (menu_addr, wd, ev.ev_mmgpbuf[4]);
					/* return menu to normal */
					menu_tnormal (menu_addr, ev.ev_mmgpbuf[3], true);
					break;

				// REMAINING CASES
			}
		}
	} while ((MN_SELECTED != ev.ev_mmgpbuf[0]) ||
                 (MAIN_MENU_QUIT != ev.ev_mmgpbuf[4]));
}
Create an instance of the EVENT struct. |
|
| Set the flags for the event types to listen for. | |
Make the call to EvntMulti. |
|
Test the event type, just as with evnt_multi. |
|
Slots in ev store the return values, like the variables used in evnt_multi. |
12.3. Sample Program: Binary Clock
In the 'clock' folder of the source code which accompanies this guide is a simple clock program. To be a little different, this displays clock times in binary. (This program looks best in colour.)
The program illustrates the use of the timer event, along with the usual close/top/move/redraw messages for a GEM window. The program simply redraws its display after each second.
void event_loop (struct win_data * wd) {
	EVENT ev;

	/* listen for AES events and timer events */
	ev.ev_mflags = MU_MESAG | MU_TIMER;

	/* timer should fire every second */
	ev.ev_mtlocount = 1000;
	ev.ev_mthicount = 0;

	do {
		int event_type = EvntMulti (&ev);

		if (event_type & MU_TIMER) {
			/* when the timer event occurs, we need to update our display */
			GRECT rec;

			wind_get (wd->handle, WF_WORKXYWH, &rec.g_x, &rec.g_y, &rec.g_w, &rec.g_h);
			do_redraw (wd, &rec);
		}

		if (event_type & MU_MESAG) {

			// USUAL TOP/MOVE/REDRAW events

		}
	} while (ev.ev_mmgpbuf[0] != WM_CLOSED);
}| Set up the listener for AES menu/window events and timer events. | |
| Set up the timer count to fire every second. | |
| After receiving an event, check if it is a timer event, and redraw the display if so. |
12.4. Sample Program: Version 7
In version 7 of the program, we include a menu. The menu provides an 'about' dialog, a way to quit the program, and a menu to select which poem to show.
The menu was created in Resource Master, and saved into the RSC file. The C header was exported, creating the .rsh file. The .rsh file is needed for compiling, and the RSC file for running the program.
The 'Quit' option may be triggered via the menu or by keyboard, so this version
uses multiple events in the event loop; two event loops are provided, one
for the traditional approach, and one using AHCC’s custom one. The 'About'
option displays a simple dialog box: this uses the built in form_alert call
to construct a dialog. I explain more about this and dialogs in general in
the next section.
Finally, this version allows us to open and close poems as we wish. So the window creation code has been changed to allow for a more dynamic set of windows, and the window close code has been changed, to only close the selected window, not exit the program. The program is only exited with the 'QUIT' option.
13. Dialogs
A dialog is a collection of widgets, such as text fields, check boxes and buttons, where the user can view or provide information. Dialogs usually require a response from the user before the program will continue processing. The file selector is an important example of a dialog: when a file selector is shown, the user must either select a file or cancel the dialog to proceed.
There are two ways of creating our own dialogs. The first presents a simple set of information, and allows one of up to three buttons to be clicked in response. The second way allows for arbitrarily complex dialogs to be constructed.
13.1. File Selector
This is an important and useful dialog, enabling the user to select a
filename to save or open. The main function to use is fsel_exinput.
This works on all TOS versions from 1.04 up. The function will call
whichever file selector the user has installed: either the basic TOS
file selector, the one supplied by XaAES, or even a custom third-party
file selector.
We call the function in the following way:
char path[1000], name[200];
int i, button;

for (i = 0; i < 1000; path[i++] = '\0');
for (i = 0; i < 200; name[i++] = '\0');
path[0] = Dgetdrv() + 65;
strcpy (&path[1], ":\\*.*");
fsel_exinput (path, name, &button, "Select text file to open");

if (button == 1) {
	// DO SOMETHING WITH THE FILE
}| Set aside some space for the path and filename. | |
Create some variables: button is used for the clicked button. |
|
| Clear out the path and filename. | |
Set the initial path to the current drive (Dgetdrv returns 0 for
drive A, 2 for drive C etc, so add to ASCII for 'A' to get the drive letter). |
|
| Add the general file pattern to the end of the path, along with a file mask. | |
| Call the file selector. The last argument is a message, displayed on the dialog. This lets you provide a hint to the user of what they need to do. | |
| Check if the OK button was clicked. |
Note how we need some space for the path and filename. These need to be
large enough to accommodate nested folders, and also, if you are using a
modern AES, long filenames.
The file mask added to the end of the path may be general, like "*.\*" or
more restricted, like "*.C" or "*.TXT".
The file selector will initially show the files at the given path using any
mask, and will modify the path and name values based on what the user
selects. button is returned with the value 0 for cancel and 1 for OK.
(If you are using a very old version of TOS, replace fsel_exinput
with fsel_input, which works the same except that there is no message
label.)
13.2. Form Alerts
The form alert is the simplest kind of dialog. The user is presented with up to 5 lines of text, and up to 3 buttons to choose from. An optional icon may also be displayed.
Creating and showing a dialog is very simple. The dialog’s description is created in a string, made of three parts:
-
icon: the number of the icon to use, 1 for warning, 2 for query, 3 for stop.
-
text: up to 5 lines of text, separated by | marks (up to 32 characters each line).
-
buttons: up to 3 button labels, separated by | marks (up to 20 characters per button - but the width must be less than the text width).
The call is simply:
int result = form_alert (1, "[icon][text][buttons]"); The first parameter indicates the default button, which is triggered by pressing
return. result holds the button number that was clicked. |
For example, a query about whether the program should overwrite an existing file might go:
int result = form_alert (1, "[2][File already exists|Overwrite?][Overwrite|Cancel]");

if (result == 1) {
	// overwrite the file
} else {
	// cancel the operation
}
13.3. User-Defined Dialogs
More complex user-defined dialogs may be built using your resource construction program, such as ResourceMaster. The definitions are saved within the RSC file, and can be retrieved by our program. (The sample code in this section is taken from the temperature conversion sample program.)
Creating and deleting a dialog is fairly straightforward:
rsrc_gaddr (R_TREE, TEMP, &dial_addr);

form_center(dial_addr, &dial_x, &dial_y, &dial_w, &dial_h);
form_dial(FMD_START, 0, 0, 10, 10, dial_x, dial_y, dial_w, dial_h);

// WORK WITH DIALOG

form_dial(FMD_FINISH, 0, 0, 10, 10, dial_x, dial_y, dial_w, dial_h); | Retrieve the address of the dialog from the RSC file. | |
| Centre the dialog on the screen: the variables are given the values for the dialog’s x,y,w,h coordinates. | |
| Create the dialog (START). The 0,0,10,10 is the origin of the growing boxes animation. | |
| Delete the dialog (FINISH). The 0,0,10,10 is the target of the shrinking boxes animation. |
The main interactions with a dialog are through any text that the user may input, and buttons that the user may click. (Different versions of AES and Resource Construction programs may offer additional widgets.)
The dialog is managed using a version of the event loop, already familiar
to us. Dialogs have their own event function, form_do.
int choice;

do {

	objc_draw(dial_addr, 0, 8, dial_x, dial_y, dial_w, dial_h);
	choice = form_do (dial_addr, TEMP_TEMP);

	/* do action */
	switch (choice) {

		// CASE STATEMENTS, ONE FOR EACH BUTTON
	}

	/* revert the button to normal state */
	dial_addr[choice].ob_state = NORMAL;

} while (choice != TEMP_CLOSE); | Draw the dialog on the screen, at given location/size. | |
| Allow the user to interact with the dialog, and return the value of any button that was clicked. The second argument should identify the widget to take initial focus: in this case we use the input text field. | |
| Do the appropriate action for the clicked button. | |
| Like menu items, buttons are inverted when clicked: we must set their state back to normal when we have finished processing them. | |
| Exit the event loop when the close button has been clicked. |
Strings are handled by locating a pointer to the string in the dialog box. The following function locates a given string:
/* returns a pointer to an editable string in a dialog box */
char * get_tedinfo_str (OBJECT * tree, int object) {
	return tree[object].ob_spec.tedinfo->te_ptext;
}
Strings can be read from and displayed on the dialog directly from the returned pointer. For example, the sample program has the following sequence:
char * temp;
char * result;

rsrc_gaddr (R_TREE, TEMP, &dial_addr);

temp = get_tedinfo_str (dial_addr, TEMP_TEMP);
result = get_tedinfo_str (dial_addr, TEMP_RESULT);

sprintf (temp, "");

// .... IN SWITCH STATEMENT

	case TEMP_CONVERT:
		sprintf (result, "Fahr: %d", 32+(9*atoi(temp))/5);
break;| Create pointers for the strings in the dialog. | |
| Associate the pointers with the actual dialog strings. | |
| Clear the input part of one of the strings. | |
Read the value in the string temp, for the value typed by the user,
and write the value to display directly into result. |
|
|
In the sample program, the first field TEMP_TEMP is an input, of type
FTEXT. It has an initial displayed string, and then the value. Only the value
is read or changed in our program. The second field TEMP_RESULT is for the
output, and is of type TEXT. When we write to this, we need to also write the
initial title for the string, because it was included in the field when the
dialog was constructed.
|
13.4. Sample Program: Version 8
Version 8 of the program now includes an option to open a file stored on disk as a text file, illustrating the use of a file selector dialog. A useful part of the code combines the path and name from the file selector into a complete filename:
if (button == 1) {
	/* Create some space to store the combined path and name */
	char * filename = malloc (sizeof(char) * (strlen(path)+strlen(name)+1));
	/* Add the path to the filename */
	strcpy (filename, path);
	/* find last \ (to remove the file mask at end of path)
	   Every path must have a \ character.
	 */
	for (i = strlen(path); i >= 0 && filename[i] != '\\'; i -= 1);
	/* Add the name to filename, overwriting any extension mask */
	strcpy (filename+i+1, name);

	// DO SOMETHING WITH THE FILE

	/* Return the space allocated */
	free (filename);
}
13.5. Sample Program: Temperature Converter
This sample program, in the folder "TEMPCONV", is a standalone program. It provides a simple dialog which converts temperatures from fahrenheit to celsius. It illustrates how to access information in text fields, and how to respond to button clicks.
14. The Mouse: Appearance and Events
The mouse is an important device for interacting with GEM programs. In most cases, the AES manages how the mouse moves over the screen, triggers events in our windows, and selects menus. However, sometimes we need to have more control over the mouse. We may need to respond to mouse movement or clicks within our windows, and we may even want to change how the mouse cursor looks.
14.1. Mouse Appearance
GEM allows us to determine the mouse pointer’s appearance. The function that does this is:
graf_mouse (form, mouse_form);form takes one of the values in the following list, and sets the mouse form:
// mouse forms

#define ARROW             0
#define TEXT_CRSR         1
#define HOURGLASS         2
#define BUSYBEE           2
#define POINT_HAND        3
#define FLAT_HAND         4
#define THIN_CROSS        5
#define THICK_CROSS       6
#define OUTLN_CROSS       7
#define USER_DEF        255
#define M_OFF           256
#define M_ON            257
| Used to turn the mouse off, e.g. when updating the display. | |
| Used to turn the mouse back on, e.g. after updating the display. |
mouse_form is used for form USER_DEF, the user-defined mouse form.
In most cases, we don’t use this argument, and can provide 0L as its value
(as is done in draw_interior in the sample code).
CManShip contains an example of creating a custom mouse form;
see the code for chapter 12.
14.2. Mouse Events
There are two kinds of events for the mouse which EvntMulti can
respond to. The first is a click/double-click on the screen - the event
type is MU_BUTTON. The second is when the mouse moves in or out of a
region; up to two regions can be monitored at a time - the event types
are MU_M1 and MU_M2.
The following code, from the Sketch example program, illustrates these three events. The code looks for a single mouse click down or release in the window, and whether the mouse is within the working area of the window or not. The mouse cursor is changed to a cross hair when within the working area.
	ev.ev_mflags = MU_BUTTON | MU_M1 | MU_M2 | MU_MESAG;

	do {
		int event_type;
		int x, y, w, h;

		/* if we have not started a line, look for left button down
		   else look for left button up
		 */
		ev.ev_mbclicks = 1; /* look for a single click */
		ev.ev_bmask = 1; /* look for the left button */
		ev.ev_mbstate = (in_line ? 0 : 1); /* 0 if in line, is button up */

		/* set the dimensions of the window in M1 and M2 events
		   this must be done every loop, as window size may change
		 */
		wind_get (wd->handle, WF_WORKXYWH, &x, &y, &w, &h);
		ev.ev_mm1flags = false;
		ev.ev_mm1x = x;
		ev.ev_mm1y = y;
		ev.ev_mm1width = w;
		ev.ev_mm1height = h;
		ev.ev_mm2flags = true;
		ev.ev_mm2x = x;
		ev.ev_mm2y = y;
		ev.ev_mm2width = w;
		ev.ev_mm2height = h;

		event_type = EvntMulti (&ev);

		/* If left button clicked / released; start / draw line */
		if (event_type & MU_BUTTON) {
			if (in_line) {
				/* finished line, so draw line and start again */
				pxy[2] = ev.ev_mmox;
				pxy[3] = ev.ev_mmoy;
                                graf_mouse (M_OFF, 0L);
				v_pline (app_handle, 2, pxy);
                                graf_mouse (M_ON, 0L);

				in_line = false;
			} else {
				/* starting line, so record position */
				pxy[0] = ev.ev_mmox;
				pxy[1] = ev.ev_mmoy;
				in_line = true;
			}
		}

		/* If mouse entered our window, cursor to cross hair */
		if (event_type & MU_M1) {
			graf_mouse (THIN_CROSS, 0L);
		}

		/* If mouse left our window, cursor to arrow */
		if (event_type & MU_M2) {
			graf_mouse (ARROW, 0L);
		}

		if (event_type & MU_MESAG) {

			// CODE TO HANDLE EVENTS

		}
	} while (ev.ev_mmgpbuf[0] != WM_CLOSED);
}| The flags are set to respond to four different events | |
Information for the MU_BUTTON event, waiting for a mouse button
event. Here we look for a single click with the left button. We
look for the button going down or the button coming up, depending
on whether we are currently within a line. |
|
MU_M1 looks for mouse entering the work area of the window. |
|
MU_M2 looks for mouse leaving the work area of the window. |
|
| Respond to mouse button event by either storing the line’s start, or drawing the line. | |
Respond to MU_M1 event by setting mouse cursor to cross hair. |
|
Respond to MU_M2 event by setting mouse cursor to arrow. |
For the MU_BUTTON events, which listen for the mouse button events,
we must determine if we are listening for single or double clicks, and for
one or both of the buttons.
-
ev_mbclicksis set to 1 for a single click, 2 for double click. -
ev_bmaskis the mask, to determine which button or buttons to listen to. Bit 0 is for the left button, and bit 1 for the right button. So set this to 1 for the left button, 2 for the right button, or 3 for both buttons. -
ev_mbstatedetermines if we are listening for a mouse down (0) or a mouse up (1) event.
Once an MU_BUTTON event has occurred, we receive various information about
the event:
-
ev_mmoxis the x-coordinate of the mouse pointer -
ev_mmoyis the y-coordinate of the mouse pointer -
ev_mmobuttontells us which button(s) caused the event: bit 0 for the left button, bit 1 for the right button.
14.3. Sample Program: Sketch
For the sample program, we create a simple drawing program "Sketch". This provides a simple window, and is purely to illustrate the use of the mouse events. While the mouse is over the window, the pointer will show as a cross hair, returning to an arrow when outside its window. Holding the left button down will start a line; releasing the left button will draw the line on the screen. Note: there is no record maintained of the lines, so the drawn lines will disappear if you obscure the window. This program is also badly behaved, as it’s possible to draw lines outside its window.
15. Selected Events of TOS 4.0+
So far, we have kept our treatment of GEM programming at a level which would suit all Atari GEM platforms, from the Atari ST running TOS 1.04 to powerful clones such as the Firebee running Mint/XaAES. The later versions of AES do, however, support additional events and features which are worth including in your programs, if you wish them to run on the more powerful systems.
This list is a very incomplete summary of some events I have started including in my GEM programs:
-
Shading: Shading is where the window is collapsed into its title bar. On Mint/XaAES this is achieved by right- or double-clicking the title bar. When shaded, windows should not redraw themselves or respond to keyboard events. One way to handle this is to:
-
include a flag
shadedinwin_data -
set this flag to true when receiving the message
WM_SHADED -
set this flag to false when receiving the message
WM_UNSHADED -
in
draw_interior, simply return ifwd→shadedis true, before drawing anything
-
-
AP_TERM: this message is sent to tell your application to quit. You can handle this in the event loop, by checking that
msg_buf[0] != AP_TERMin the condition of the do-while loop. -
WM_ONTOP: If another window is closed which leaves your window on top, this message is sent to your application. This is useful in circumstances when you want to update some displayed information based on the current top window. (Sokoban uses this to enable or update checks on menu items for the current top window.)
-
WM_BOTTOMED: A single click on the window title in Mint/XaAES sends the window back in the window list. To support this, include the following code in event loop, within the switch statement of message types:
case WM_BOTTOMED:
	wind_set (msg_buf[3], WF_BOTTOM, 0, 0, 0, 0);
break;| Set the given window handle to the bottom. |
16. Scrap Library
The scrap library is GEM’s version of the cross-application clipboard. Using the scrap library, we can copy information from one application and paste it into another.
First, the bad news: many programs do not use the GEM scrap library. For example, some word processors such as Marcel and Protext use their own custom clipboards, and so do not support copy and pasting information to or from other applications. This is also true of our favourite IDE, AHCC.
Second, the even worse news: as with most features of GEM, the scrap library
leaves everything to the programmer. The scrap library is nothing more
than a file stored in a known folder. This folder is identified by calling
scrap_read, which retrieves the current scrap folder. In addition, as
different desktop environments may provide paths to the scrap library/clipboard,
we need to check for these. If there is no current scrap folder, then our
program must create it.
Once the scrap folder is located, we either read from a file named "SCRAP", if we are, for example, pasting a piece of copied information. Alternatively, we may write to a file named "SCRAP" if we are copying some information. The file extension for the "SCRAP" file is set appropriate to the data we are saving, e.g. ".TXT" for text data. When writing a file, we need to first delete any existing files named "SCRAP.*" in the scrap folder.
One final refinement: if we save a file into the scrap folder, we should let other applications and the desktop know, so they can update their displays or information about the scrap library.
16.1. Using the scrap library
I will simply give two functions here, which firstly find the location of the scrap folder, and secondly update any other users of the scrap folder when we have changed it.
The following function requires a reference to some allocated space, and will place into that space a full path name to a file "SCRAP.TXT" in the scrap folder. If the scrap folder does not already exist, it will be created.
void get_clipboard_file (char * scrap_path) {
	char * env_scrap_path = NULL;
	char dirname[PATH_MAX];
	struct ffblk cur_file;

	/* check possible environment variables */
	shel_envrn (&env_scrap_path, "CLIPBOARD=");
	if (env_scrap_path == NULL) {
		shel_envrn (&env_scrap_path, "CLIPBRD=");
	}
	if (env_scrap_path == NULL) {
		shel_envrn (&env_scrap_path, "SCRAPDIR=");
	}

	if (env_scrap_path == NULL) {
		/* if not found, use the scrap_path result */
		scrp_read (scrap_path);
	} else {
		/* copy env_scrap_path into scrap_path */
		strcpy (scrap_path, env_scrap_path);
	}

	/* check we have a valid path, adding \ to end if needed */
	if (scrap_path[strlen(scrap_path)-1] != '\\') {
		if (strlen(scrap_path) < PATH_MAX - 2) {
			int end = strlen(scrap_path)-1;
			scrap_path[end] = '\\';
			scrap_path[end+1] = 0;
		}
	}

	/* set up clipboard folder if one does not exist */
	if (strlen (scrap_path) == 0) {
		int curr_drive = Dgetdrv ();
		/* cannot modify an in-place string, so copy it:
		   this caused a strange error, where menu would not
		   reappear when re-focussing the application.
		 */
		char * folder = strdup("A:\\CLIPBRD\\");

		folder[0] += curr_drive; /* set to current drive */
		Dcreate (folder);        /* make sure it exists */
		scrp_write (folder);     /* write the clipboard folder */
		scrp_read (scrap_path);  /* read it back in */
		free (folder);
	}

	/* delete any SCRAP.* files currently in the scrap directory */
	strcpy (dirname, scrap_path);
	strcat (dirname, "SCRAP.*");
	if (findfirst (dirname, &cur_file, 664) == 0) {
		do {
			char * filename = malloc (sizeof(char) * PATH_MAX);
			if (strcmp (cur_file.ff_name, ".") == 0) continue;
			if (strcmp (cur_file.ff_name, "..") == 0) continue;
			strcpy (filename, scrap_path);
			strcat (filename, cur_file.ff_name);
			remove (filename);
		} while (findnext (&cur_file) == 0);
	}
	/* Write data as plain text */
	strcat (scrap_path, "SCRAP.TXT");
}| First, look in some standard environment variables for an existing path to the scrap folder. | |
If one is not found, use scrap_read to see if GEM already has a
record of the scrap folder. |
|
If one was found, use that one by copying it to scrap_path. |
|
| If no existing path has been found, then we need to create the scrap folder. | |
| Create folder "CLIPBRD" in the current drive. | |
And set it as the scrap folder using scrap_write, reading this
back into scrap_path using scrap_read. |
|
Use findfirst and findnext to loop through all the "SCRAP.*" files
existing in the scrap folder, to delete them. |
|
| Finally, append the name of the scrap file to the path. |
The following code can be used to update the clipboard observers, given
the path of the scrap folder. The message types and appl_search
functions are only suitable for later versions of TOS 4.0+, so don’t use
this function on TOS 2.06 or earlier on your Atari ST.
void update_clipboard_observers (char * path) {
	short msg[8] = {0, 0, 0, 0, 0, 0, 0, 0};
	char name[PATH_MAX];
	int id, type;

	if (strlen(path) < 3) return; /* if too short to be a path */

	/* update desktop */
	msg[0] = SH_WDRAW;
	msg[1] = app_handle;
	msg[3] = toupper(path[0]) - 'A';
	if (appl_search (APP_DESK, name, &type, &id) == 1) {
		appl_write (id, 0, msg);
	}

	/* inform other applications */
	msg[0] = SC_CHANGED;
	msg[3] = 0x0002; /* updated a text file */
	if (appl_search (APP_FIRST, name, &type, &id) == 1) {
		do {
			appl_write (id, 0, msg);
		} while (appl_search (APP_NEXT, name, &type, &id) == 1);
	}
}| If the desktop is showing the scrap folder, then we want it to refresh its display. | |
| The third argument gives the drive number: 0 is A, 2 is C etc. | |
| Finds the id reference for the desktop. | |
| Sends the desktop the message to update its display of the given drive. | |
| Other applications may be dealing with the scrap folder, so we let them know the scrap folder has changed. | |
Use appl_search to locate the first application. |
|
| Send the message to the current application. | |
| Loop with the next application, until all applications have been called. |
16.2. Examples
Of my own programs, only BibFind uses the scrap library.
For a sophisticated use of the scrap library, and indeed GEM in general, see GEMClip: http://gemdict.org/gemclip
17. Sokoban: A More Complex Example
As a more complex example of a complete GEM program, my Sokoban implementation may be worth a look. The program illustrates use of a menu, multiple windows, file selector and multiple event types.

If you review that source code, you will find many things similar to the code in this document, however, some things are different. This document was written, in part, to simplify and unify the code I have for GEM handling in my programs, and I haven’t put all the simplifications back. Also, in a larger application, there are simply more things to handle, which add a layer of complexity.
In particular, note how I manage different window types: there is one
window showing a list of levels, and other windows showing the levels
in the game, and a third window type is used to show statistics. I
have a slot in win_data called window_type, and this is set to
LEVELS, POSITION or STATISTICS when the window is created. Within
draw_interior I now switch to the appropriate calling code, depending
on the window type.
Additionally, in some situations, such as when a move is made, not all
of the window needs to be redrawn. I have used a flag for the type of
update: when a move is made, this flag is MOVE. The drawing code for
the position will then only update the parts of the window related to that
last move. Such refinements are necessary to prevent your application
flickering too much, due to constant updates.
Sokoban also provides an example of evnt_multi, as the program responds
to window events, as above, but also mouse and keyboard events. Double
click mouse events are monitored and, when they occur on the table of levels,
their position is compared with a list of positions of the level names, so
the program can open the correct level as selected in the table.